
Detailed Introduction to MxServiceCode in the Cloud Drawing Development Kit
I. Introduction: What is MxServiceCode?
When developing Web CAD applications, we often encounter requirements that need to process drawings in the server background, such as batch format conversion, extracting drawing data, etc. At this time, MxServiceCode in the Cloud Drawing Development Kit comes in handy.
Simply put, MxServiceCode is a typical CAD backend service layer located in the MxDrawCloudServer\Bin\MxServiceCode directory of the Cloud Drawing Development Kit. It is not a complete Web front-end application, but a lightweight encapsulation of the underlying DWG processing capabilities in the form of a Node.js Command Line Interface (CLI). Its core technology is composed of three cornerstones: the MxFun core engine, Native Addon (native C++ extension plug-in), and the mxcad object model.
This underlying architecture design ensures high performance and stability when processing complex CAD data. At the application level, it is very flexible—all backend functions are provided by "command modules" based on this core. This means that developers can easily customize and extend server-side drawing processing logic by writing or calling different command modules, just like building blocks.
II. Introduction to the MxServiceCode Project Structure
To help everyone "find the right door" during secondary development, we will disassemble the main parts of MxServiceCode in detail combined with the actual project directory structure. The project adopts standard Node.js + TypeScript engineering specifications, and the core is divided into the following sections:
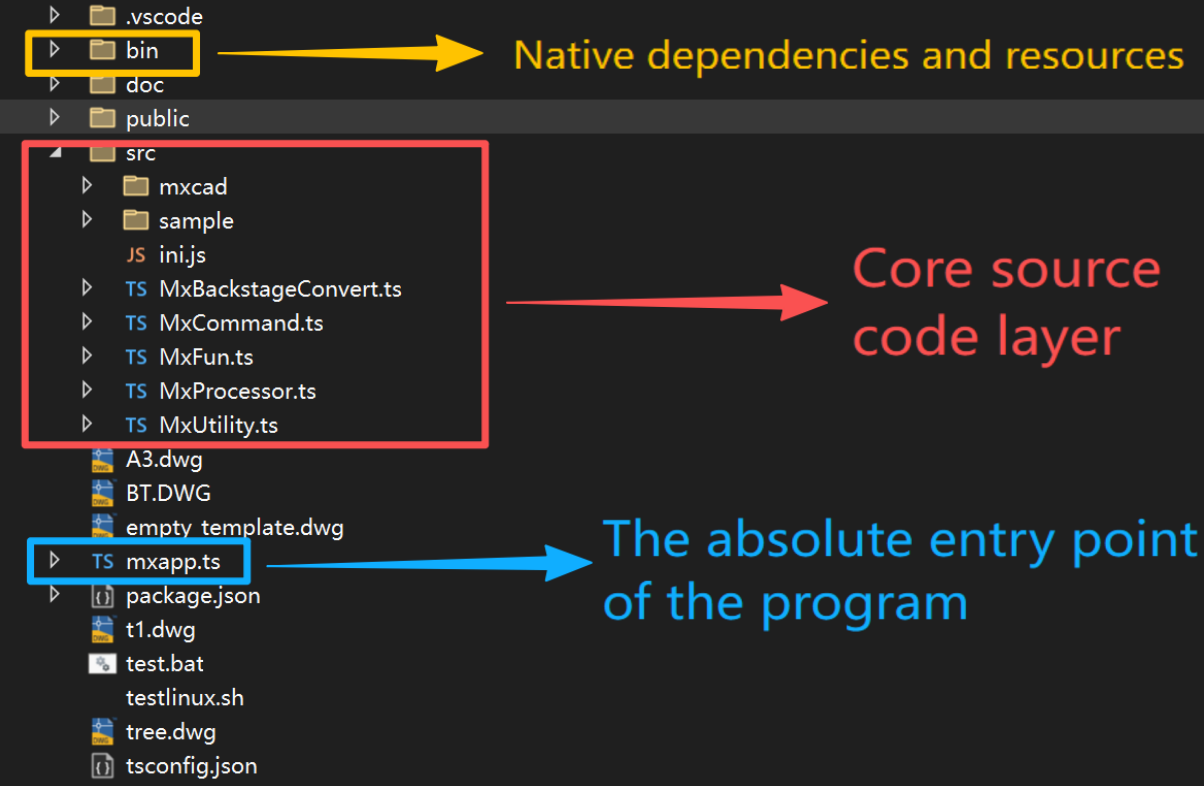
1. bin: Native Dependencies and Resources
The bin directory is the "power heart" of the entire project. It is not an ordinary script folder, but contains the underlying binary files and resources necessary for the project to run. MxServiceCode can process complex DWG drawings entirely relying on the native environment support provided by this directory.
Mx2DNode.node: The core Native module, the underlying engine that actually executes DWG parsing and conversion.
fonts: DWG font files to ensure that text is not garbled during background conversion.
2. src: Core Source Code Layer
This is the logical processing center of the project, containing all TypeScript code from underlying engine encapsulation to specific business functions. According to different responsibilities, it can be divided into the following three parts:
(1) mxcad: Data Model Layer
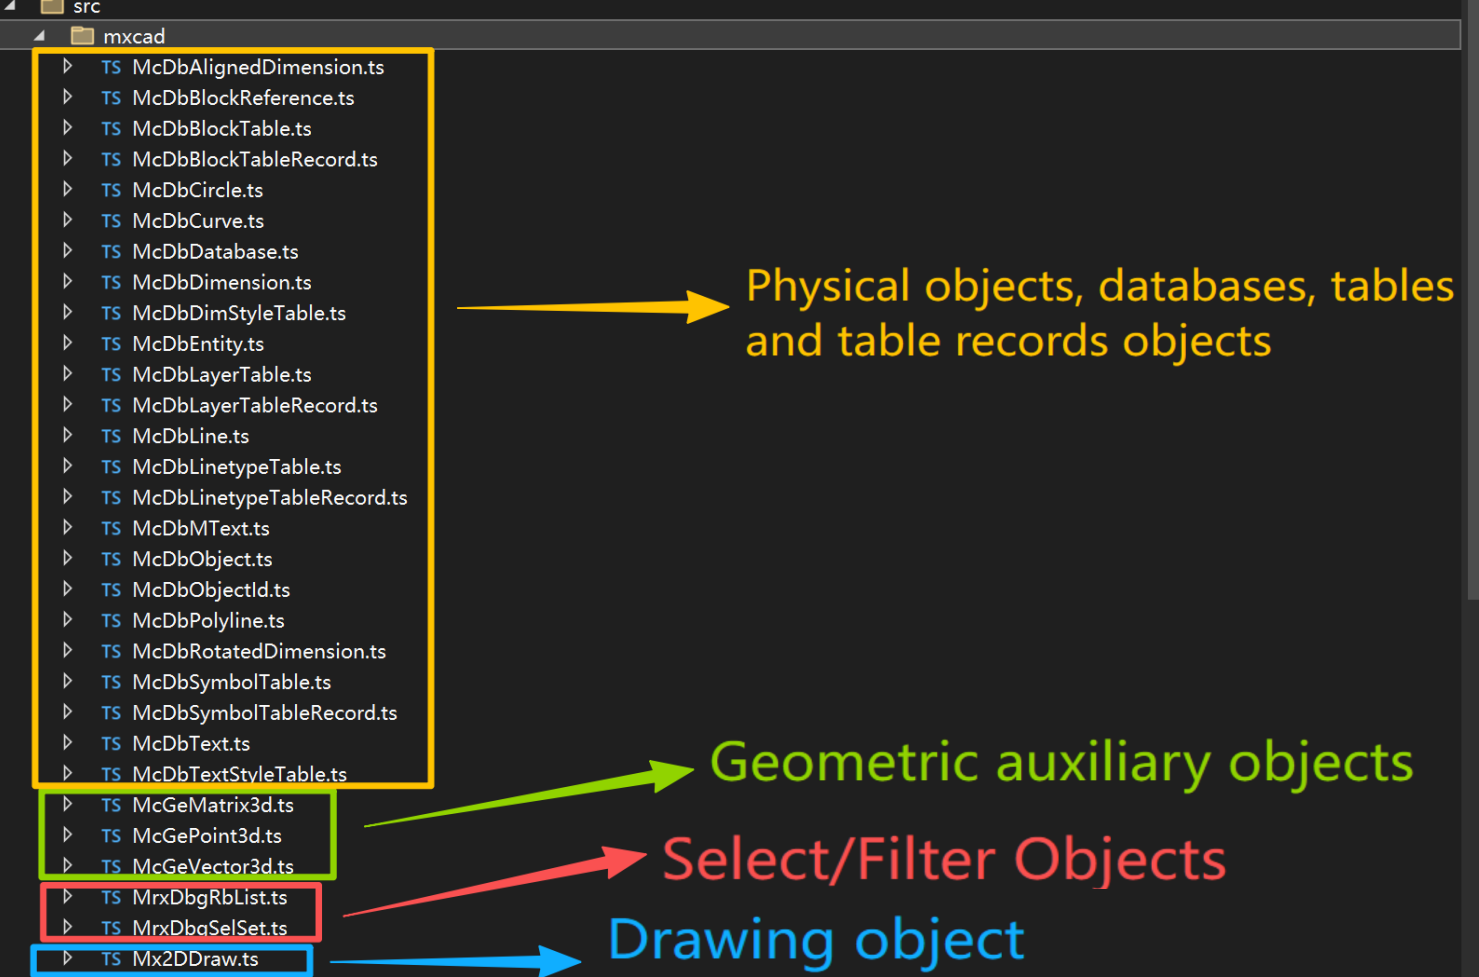
This folder is the encapsulation of the CAD object model, wrapping the underlying Native DWG objects into entities accessible by JavaScript. It contains a large number of core classes, such as:
McDbDatabase.ts: Drawing database.McDbEntity.ts,McDbPolyline.ts,McDbText.ts: Various drawing entities (such as polylines, text, circles, etc.).McDbLayerTable.ts: Layer table, used to manage the layer information of drawings.
(2) sample: Business Implementation Layer
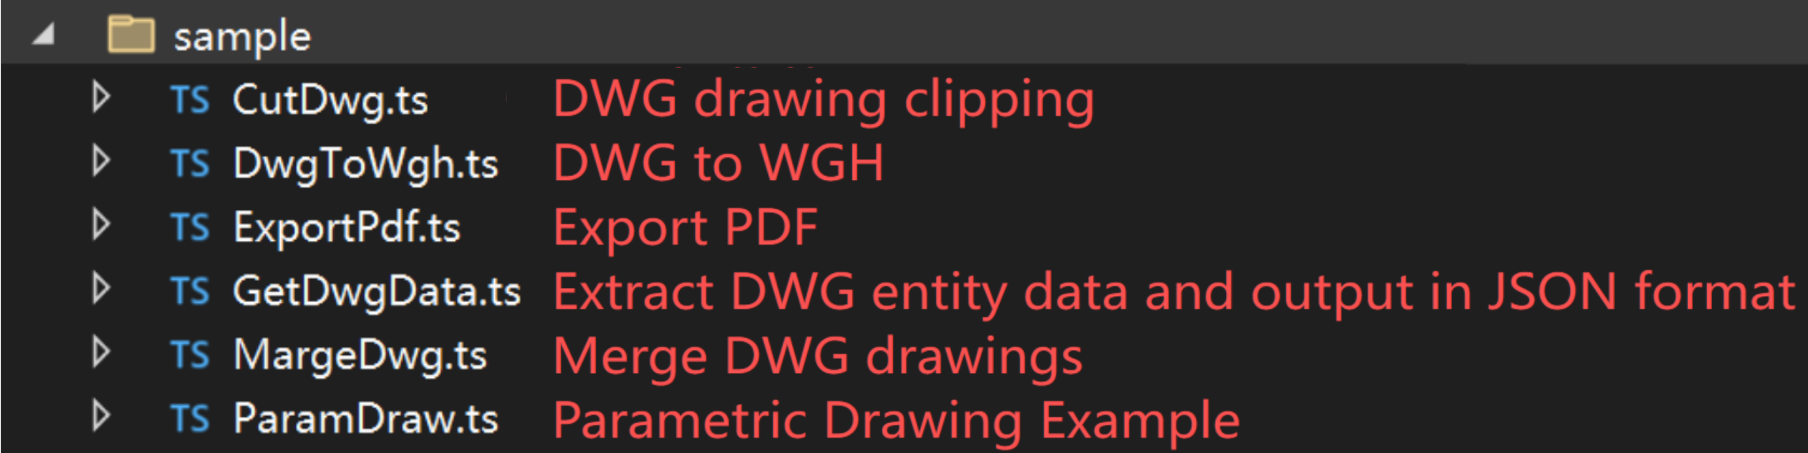
This is where actual business logic is written, and each file usually corresponds to a specific drawing processing function (such as format conversion, frame cutting, etc.).
To add new functions, you only need to add scripts here and register them in MxCommand.ts. The modular design makes expansion very flexible.
(3) Other Core TS Files
In addition to the above subfolders, the files in the root directory of src form the skeleton and control center of the program:
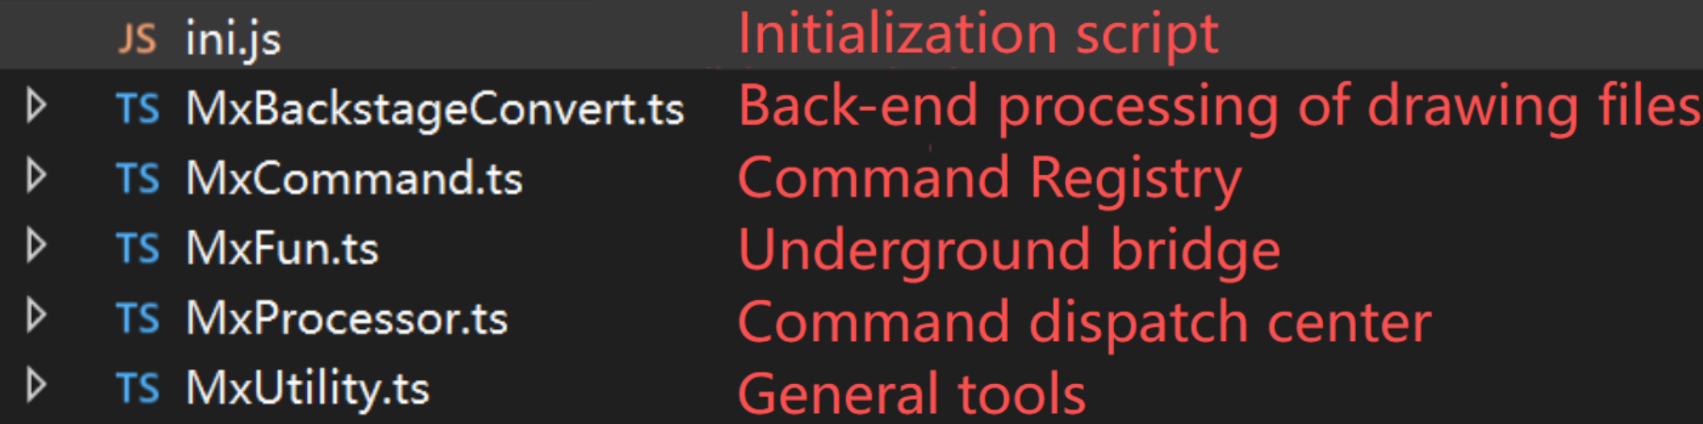
ini.js: Initialization script. Usually executed at the earliest stage of program startup, used to set environment variables or load basic configurations to ensure that subsequent modules are loaded normally.
MxFun.ts: Underlying bridge. Responsible for loading the native C++ extension (
Mx2DNode.node) in thebindirectory, initializing the CAD engine environment, and providing general tool functions such as log recording and path processing.MxProcessor.ts: Command scheduling center. Responsible for parsing externally passed command line parameters and accurately distributing tasks to corresponding business processing functions.
MxCommand.ts: Command registration table. Define the mapping relationship between all available instruction names (such as
convert,frameCut) and specific implementation functions here.MxUtility.ts: General tool library. Provides high-frequency auxiliary methods reused by various modules in the project to reduce duplicate code.
MxBackstageConvert.ts: Background processing interface for drawing files. Encapsulates the underlying DWG background processing interface, responsible for opening/saving drawings, generating WebGL output, and providing background database access.
3. Root Directory and Basic Configuration
This is the entry and configuration center of the project, determining how the program starts and runs.
mxapp.ts: Absolute entry of the program. When Node.js starts, this file is executed first, responsible for initializing the underlying environment, parsing command line parameters, and triggering command execution.
package.json / tsconfig.json: Project dependency management manifest and TypeScript compilation configuration files.
test.bat / [testlinux.sh](testlinux.sh): Cross-platform test scripts. Used to quickly verify whether functions are normal in Windows and Linux environments respectively.
.dwg (A3.dwg, BT.DWG, tree.dwg, etc.): Test drawing files that come with the project, used as input sources during development and debugging.
4. doc and public Directories
doc: Stores relevant technical documents or API descriptions for developers to consult.
public: Static resource directory. If MxServiceCode starts a simple HTTP service, the files here (such as HTML preview pages, CSS/JS resources) can be directly accessed externally.
III. Command Execution Link

After understanding the project structure, we need to delve into how MxServiceCode processes a complete request. Its command execution link is very clear, and the core logic can be summarized as: Command line input → MxProcessor scheduling → Business implementation → Underlying processing → JSON output. The specific process is as follows:
1. Program Startup and Parameter Reading
When we enter a command in the terminal, Node.js will first execute the entry file mxapp.ts. After the program starts, it will immediately call MxFun.init() to initialize the underlying C++ runtime environment. Then, it will obtain all parameters passed by the user in the command line through process.argv.slice(2). If no commands are passed at this time, the program will directly output version information and log path and exit.
2. Command Distribution and Registration
When valid parameters are detected, the program will enter MxProcessor.do(args) for command distribution. Before distribution, MxProcessor will first call ReginstCommand() to complete command registration. This function is located in MxCommand.ts, and its role is to map specific command names (such as convert, frameCut, margeDwg, etc.) one-to-one with the specific implementation functions in the sample directory.
3. Parameter Parsing and Execution
MxProcessor supports two parameter parsing modes: one is the standard command name=value form, and the other is reading external JSON files through fileparam filepath=.... After parsing the command name and parameters, MxProcessor will look for the corresponding processing function in the registered command table. If not found, it will directly return an error of "command not defined"; if found, it will execute the function immediately.
4. Business Logic and Underlying Interaction
When the command implementation function in the sample directory is triggered, it will start processing specific business logic. They usually call modules such as MxBackstageConvert or Mx2DDraw to operate drawings. After receiving the instructions, these modules will pass the request to the real underlying core—the Native module (Mx2DNode.node) loaded by MxFun. The Native module is responsible for executing the most time-consuming underlying operations such as DWG file opening, entity traversal, and data conversion.
5. Unified Result Output
After the Native layer completes all drawing processing tasks, the results will be returned layer by layer to the command implementation function. The command function will encapsulate the processing results into a standard object (for example, containing success and message fields). Finally, MxProcessor.do() will use console.log(JSON.stringify(...)) to uniformly output this object in JSON format. This standardized output method makes it extremely convenient for external Web services or calling programs to read and process execution results.
IV. Function Testing
Before officially experiencing the powerful drawing processing capabilities of MxServiceCode, there is a key prerequisite step: if you need to call these functions through HTTP interfaces, you must first start the web service in the Cloud Drawing Development Kit to ensure that port 1337 is running normally.
1. Start the Port 1337 Service (Prerequisite Preparation)
The MxDraw Cloud Drawing Development Kit provides an extremely simple one-click startup method, and you do not need to manually configure a complex background environment:
Windows system: Double-click to run
MxDrawCloudServer/Mx3dServer.exedirectly, and click "Start Web Service" in the pop-up window. The program will automatically start the CAD core engine service on port 1337 (driven byBin/MxDrawServer/Windows/app.js).Linux system: Execute the startup script
./start_demo.shin the terminal, which will automatically start the CAD core service on port 1337.
Convenient Tip: After the service is started, you can directly visit
http://localhost:1337/servertestin the browser. This is an official visual test page where you can directly click buttons to test core interfaces such as DWG conversion and PDF export without writing any code.
2. Core Functions and Parameter Details
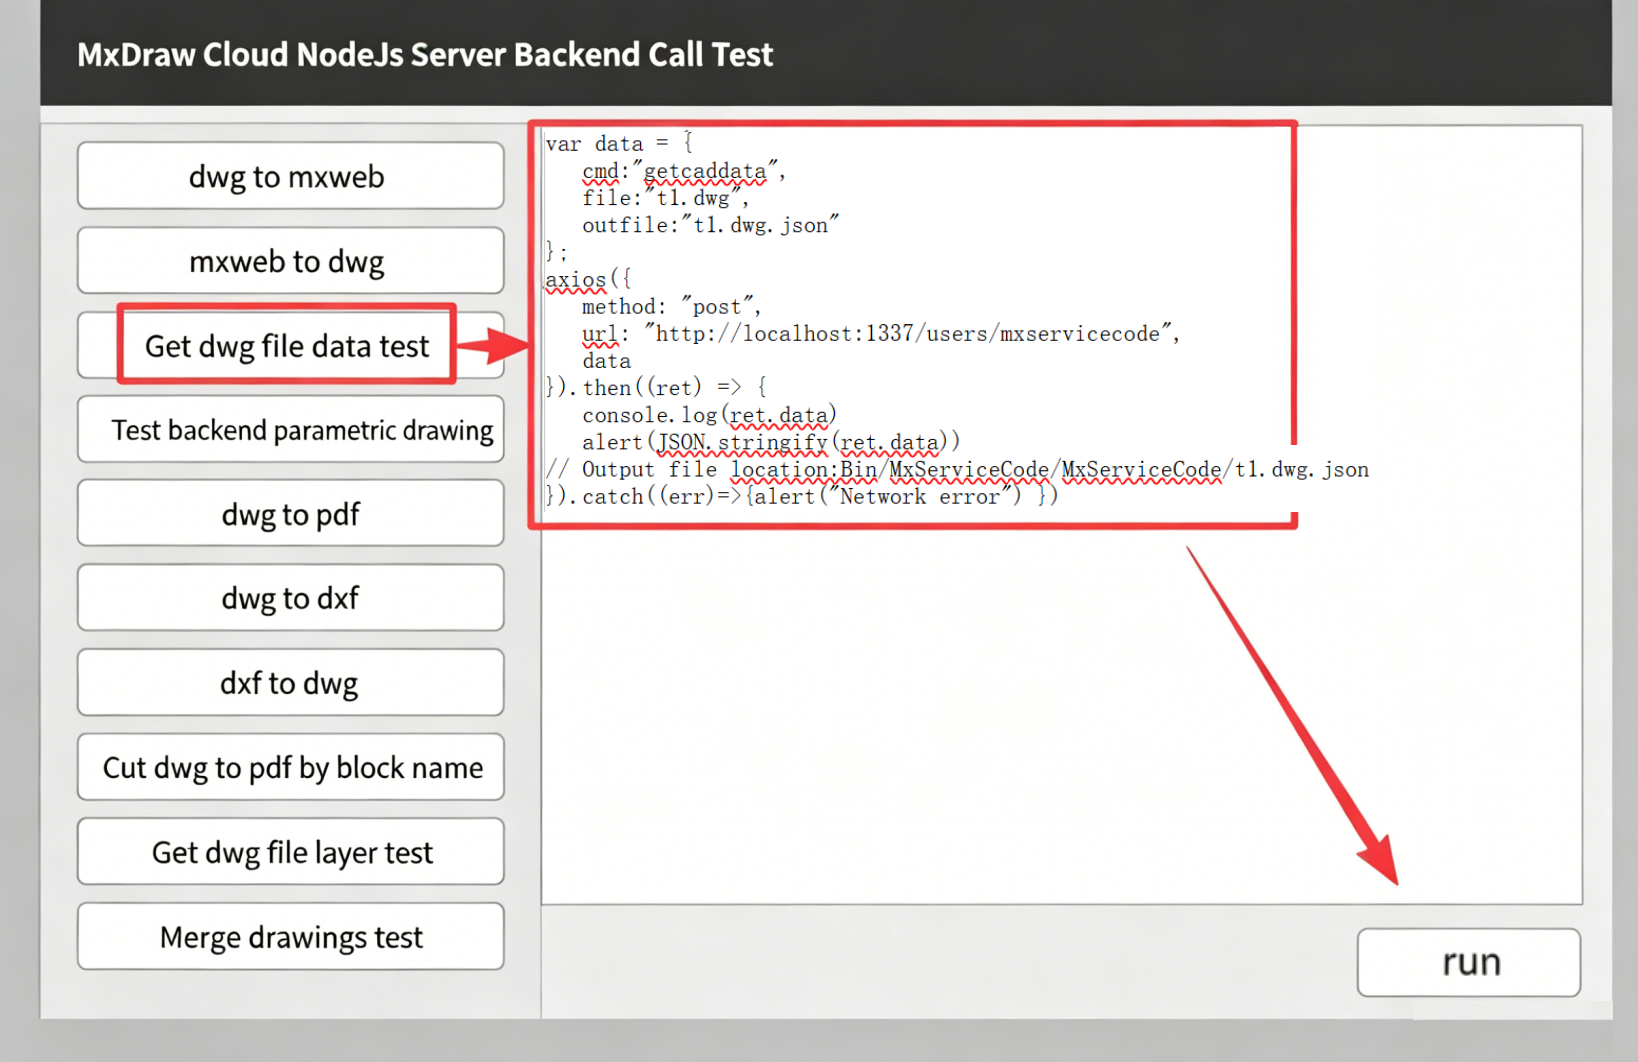
(1) Obtain Basic Data of DWG Files
Read meta-information such as entity data, version, and range of DWG drawings, and output it as a standard JSON file for easy parsing and display on the front end.
Command line call
bash./bin/node mxapp.js getcaddata file=t1.dwg outfile=t1.dwg.jsonInterface call
jsvar data = { cmd:"getcaddata", file:"t1.dwg", outfile:"t1.dwg.json" }; axios({ method: "post", url: "http://localhost:1337/users/mxservicecode", data }).then((ret) => { console.log(ret.data) alert(JSON.stringify(ret.data)) // Output file location:Bin/MxServiceCode/MxServiceCode/t1.dwg.json }).catch((err)=>{alert("Network error") })
| Parameter | Description |
|---|---|
| cmd | Target command name |
| file | Source DWG file name File path: MxDrawCloudServer\Bin\MxServiceCode\MxServiceCode |
| outfile | Generated JSON data file name File save path: MxDrawCloudServer\Bin\MxServiceCode\MxServiceCode |
(2) Background Parametric Drawing
Without manual intervention, the program opens a blank template, executes drawing operations (such as drawing specific graphics, annotations, etc.) according to preset logic, and generates a new DWG file.
Command line call
bash./bin/node mxapp.js testParamDraw outfile=testdraw.dwg debug=1Interface call
jsvar data = { cmd:"testParamDraw", //cmd:"testParamDrawTk", outfile:"testdraw.dwg", }; axios({ method: "post", url: "http://localhost:1337/users/mxservicecode", data }).then((ret) => { console.log(ret.data) alert(JSON.stringify(ret.data)) // Output file location:Bin/MxServiceCode/MxServiceCode/testdraw.dwg }).catch((err)=>{alert("Network error") })
| Parameter | Description |
|---|---|
| cmd | Target command name |
| outfile | Save path of the generated new DWG file |
| debug | Optional, debug mode switch. A value of 1 means enabling debug mode (usually outputs more log information) |
(3) Crop DWG to PDF According to Frame Name
This is a very practical plotting function. The program will automatically search for the frame (Block) with the specified name in the drawing, identify its range, and batch export the graphic content in the frame to PDF, pictures, or other formats.
Command line call
bash./bin/node mxapp.js frameCut2 file=D:/Test/testcut.dwg tkname="AAA" outtype=.pdf width="5000" height="3000"Interface call
jsvar data = { cmd:"frameCut2", file:"D:/Test/testcut.dwg", tkname:"1横20200521", outtype:".pdf", //colorPolicy:"mono" //width:"1000" //height:"1000" }; axios({ method: "post", url: "http://localhost:1337/users/mxservicecode", data }).then((ret) => { console.log(ret.data) alert(JSON.stringify(ret.data)) }).catch((err)=>{alert("Network error") })
| Parameter | Description |
|---|---|
| cmd | Target command name |
| file | Source DWG file path |
| tkname | Name of the frame to be cropped (i.e., the name of the Block) |
| outtype | Specify the format of the output file, such as .pdf, .mxweb, etc. |
| width / height | Specify the width and height of the output PDF |
| colorPolicy | Color policy. For example, setting it to mono means outputting black and white |
(4) Obtain DWG File Layer Information
Specially used to analyze the drawing structure, read the LayerTable of DWG, extract the name, color, linetype and other attributes of all layers, and output the layer list. The default output file name is original filename_layers.json.
Command line call
bash./bin/node mxapp.js getAllLayer file="D:/Test/A.dwg"Interface call
jsvar data = { cmd:"getAllLayer", file:"t1.dwg", }; axios({ method: "post", url: "http://localhost:1337/users/mxservicecode", data }).then((ret) => { console.log(ret.data) alert(JSON.stringify(ret.data)) // Output file location:Bin/MxServiceCode/MxServiceCode/t1.dwg_layers.json }).catch((err)=>{alert("Network error") })
| Parameter | Description |
|---|---|
| cmd | Target command name |
| file | Path of the source DWG file |
(5) Merge Drawings
Read the databases of multiple DWG drawings, merge the read databases into the target drawing database, and realize batch merging and splicing of drawings.
Command line call
bash./bin/node mxapp.js margeDwg file="D:/Test/mB.dwg" marge_file="D:/Test/mA.dwg" out_file="D:/Test/mC.dwg" marge_layer="['2306','2307']" debug=1Interface call
jsvar data = { cmd:"margeDwg", file:"D:/Test/mB.dwg", marge_file:"['D:/Test/mA.dwg']", out_file:"D:/Test/mC.dwg", marge_layer:"['2306','2307']", }; axios({ method: "post", url: "http://localhost:1337/users/mxservicecode", data }).then((ret) => { console.log(ret.data) alert(JSON.stringify(ret.data)) }).catch((err)=>{alert("Network error") })
| Parameter | Description |
|---|---|
| cmd | Target command name |
| file | Target DWG file (the main file to which it has been merged) |
| marge_file | The DWG files to be merged support either a single path or a JSON array. |
| out_file | Output the DWG file after merging |
| marge_layer | (Optional) The array of layers to be merged, in a format similar to ['layer1', 'layer2'] |